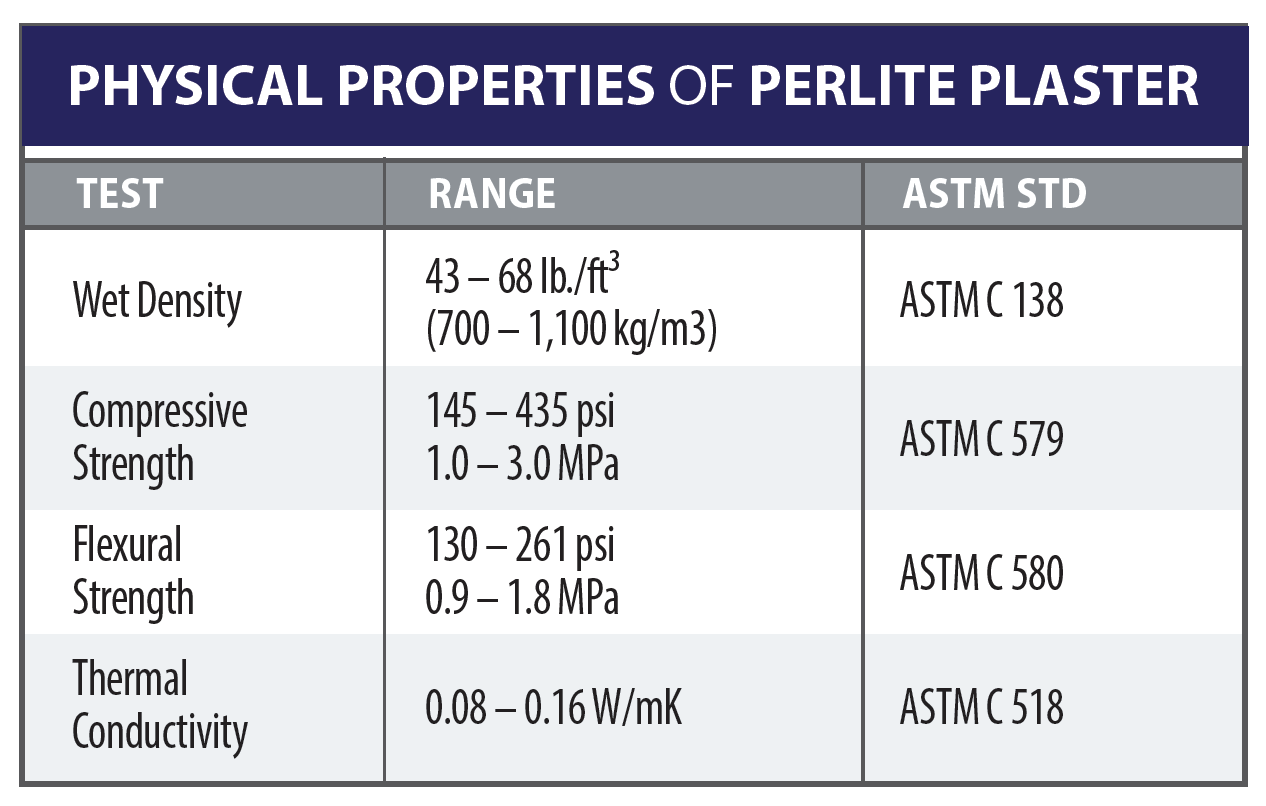
Perlite cement plaster is thermal and sound insulating, fire retardant, and extremely lightweight—weighing approximately 60% less than ordinary sand plaster.
Perlite Cement-based Plaster
Perlite cement-based plaster can be used on new or remodel work, as a basecoat for stucco finishes, and as a substrate for ceramic tile or masonry veneer. It can be applied over metal or wire lath, on top of a cementitious bonding or key coat, or directly over other surfaces prepared with an approved liquid bonding agent.
Advantages of Perlite Plaster
- Lightweight—It weighs up to 60% less than ordinary sand plaster, making it ideal for panelized wall construction†.
- Strong—Resistance to hydration cracking is dramatically increased with the addition of alkaliresistant glass or polypropylene fiber shorts.
- Insulating—It offers 4x as much thermal transfer insulation as sand plaster, and perlite lightweight concrete has been used successfully in residential construction to reduce noise transfer through walls.
- Fire Retardant—Up to 4-hour fire protection is achievable with the minimum weight and thickness. fifty (50) fire tested designs have been approved for use by recognized laboratories; it is commonly used in the protection of structural steel columns.
- Adaptable & Easy to Handle—Perlite is easy to stock and handle on the job site. A typical 4 ft.3 (110 L) sack weighs 32 lbs (14.5 kg) making it easy to pour, measure, and mix.
- Stable & Durable—It will not rot or decay, and has been used in a variety of conditions around the world since 1946.
†NOTE: In panelized constructions, where panels are fabricated in a horizontal position, the plaster may be placed monolithically, i.e., poured in one coat and screeded level. When plaster begins to set, but is still sufficiently plastic that it can be manipulated with the tools, it shall be properly floated to provide compaction.
General Considerations
- The same limitations for Portland cement plaster apply to perlite cement-based plaster.
- Because of its insulating value, perlite plaster is not recommended over radiant heating panels.
- Use of alkali-resistant glass or polypropylene fiber shorts is recommended when designing Perlite-based Portland cement mixes.
- Over monolithic concrete, the thickness of bonding plaster and perlite plaster basecoat shall not exceed 3/8 inch (10 mm) on ceilings and 5/8 inch (16 mm) on walls. If additional thickness is required, self-furred metal lath should first be secured to concrete surfaces.
- Divide large expanses of plaster with properly installed relief joints. Discontinue reinforcing lath at relief joints.
- Subject to ambient temperatures, perlite cement plaster must be water-cured between 3 – 7 days to reduce contraction and minimize cracking.
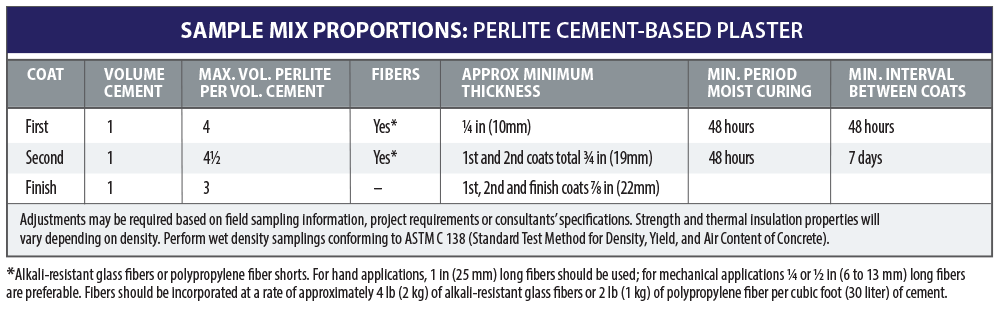
- Use of metal or wire lath typically requires three coats.
Perlite Cement Plaster INSTALLATION GUIDE
Substrate Preparations
- All surfaces must be clean, free from dust, oil, or traces of foreign materials or protrusions.
- The use of rails or spot levels at every (max.) 10 feet (3 meters) is advised to control application thickness.
- Expansion joints or grooves are recommended to allow for expansion of the plaster.
- The use of wire mesh is recommended on dissimilar materials (e.g. blockwork and columns).
- Wetting of substrate is to be done on extremely dry surfaces, but otherwise, stagnant or frequent water flow on substrate surfaces will lead to poor adhesion.
- Use of spatter dash mechanical key (textured key) or suitable bonding base coat is required on concrete surfaces to improve adhesion. Ideally, the undercoat should be keyed (using a wire scratcher) to improve adhesion of the subsequent coat.
General Mixing & Installation Instructions
- Place 80% of the required water in the mixer, followed by lime (if used) and cement. Add the remaining water and mix until the slurry is uniform, approximately 1 to 1½ minutes. Add the perlite, and any additional aggregate, and sprinkle in the chopped fibers while the mixer is rotating. Mix thoroughly until a uniform paste is formed. Mixing should not be longer than four (4) minutes.
- When using a key coat, score surface horizontally to provide adequate mechanical bond for the brown coat. Keep this scratch coat damp for a minimum of 48 hours. The brown coat may be applied immediately after the scratch coat has attained sufficient rigidity to support it. The brown coat should be brought out to proper thickness, rodded level and properly floated to densify, but left sufficiently rough to receive the finish coat.
- Apply each coat either manually or mechanically in thicknesses ranging from 1/2 inch (12 mm) up to 1-1/4 inches (30 mm).
- Perlite plaster should be water cured for a minimum of three (3) days subject to ambient temperature. Protect plaster from damage due to impact, overloading or marring of surfaces during curing period.
- When using expanded metal or wire fabric lath, use no less than three coats. On the first coat, use sufficient material and pressure to solidly fill all openings in the lath.
- In some cases, a single coat can be used if a suitable bonding surface is provided for adhesion.
To download a .pdf of the Perlite Cement-based Lightweight Insulating Plasters brochure, click here.
If you have technical questions on this topic, please email the technical contacts listed on our contact page.
Copyright © 2018 Perlite Institute All Rights Reserved